Wednesday, 13 April 2016

April tag swap

hi again

For the second post of the day, I am bringing you three little tags I've recently made for a swap over on UKScrappers.

This month we were challenged to use EMBOSSING FOLDERS for our inspiration. Suffice to say I didn't know where to start.. give me some mixed media on something so small and I'm in my element.. but to create something so small with embossing folders had me stumped for a few days.

In the end though I suddenly had a thought that I should be approaching it as though it was a card.. and then, as I had recently bought a Stampin' Up owl punch, I decided I would use that.   


First, I took a stencil, yes, not an embossing folder, but a stencil and I used it like an embossing folder with my Sizzix Big Shot. To get a decent impression I had to use a shim to get enough of a rise and then I used it as a mask afterwards and inked some distress inks through the stencil to get the wood effect.

I then embossed three pieces of cream cardstock and stuck the two background pieces together with some Stampin' Up Winter Woodland washi tape which has a small gold vein running through it.

Then I embossed a piece of pink card with a dotty embossing folder and punched the breasts of the female owls. I then punched the rest of the owls from scraps and stuck them all together and added a tiny gem to the bow tie and the hair bows on each owl. 

To finish I added two small pink pearls either side of the two owls on each tag and I added a hand written label on each. I them smeared dark pink glittery modelling paste around the edges and I was happy.

In the end, although it isn't my usual style, I was quite pleased with them.. and they are quite cute.. I just hope the recipients like them too.

Thanks for stopping by.

Elaine
x


WOYWW 358

Hi all

Today I'm bringing you my desk to participate in What's on Your Workdesk Wednesday supported by The Stamping Ground.. for more details, do pop over and have a look-see.

The remnants you can see are of five layouts I did this week..and on the left you can see some happy mail I received today that hasn't found it's way into their new home yet. Here is the mail


and here are the five layouts I made.. I also made four tags but I can't share them yet as they are for a swap over on UKScrappers.


.. of my beautiful grand-daughter

 (my personal favourite)

and here is a fun double layout of some old photos

and another layout here


and finally

 ('scuse the wonky photo!)


Also, for those of you that visited last week, you may remember that I said I was going to sort out all my scraps and stickers and ephemera.. well.. I (sort of) did it.. that is to say.. I sorted my scraps and ephemera but I failed at the stickers.. It just didn't make any sense when I started looking at them all.. how do you colour co-ordinate stickers that have several colours on them? Anyway.. here is my scraps all sorted into colours in popper wallets.. so much easier to find.. and maybe actually use?? Only time will tell! All my stickers are now all in one place too.


I also followed the tip of Shaz aka Silverwolf from her blogpost two weeks ago HERE. She suggested that we could make a grid for our drawers to stop our mists and sprays from falling over. No sooner had I seen her post I knew I had to have a go.. now I think you can see that mine isn't as straight as hers, but... it makes no difference at all.. and it keeps all my mists and sprays upright in my Ikea Alex drawer. Thanks Shaz! It works a treat.. and this is how it looks now it's all full up! I have a few sprays that are too tall so I shan't be buying that brand anymore... I can't have them spoiling my organisation now can I? LOL 


all in all a good weeks crafting and sorting!

Elaine
x


I

Sunday, 10 April 2016

My 5th CKCB Layout

Hi all

A quick post from me tonight .. here is another layout I made with my April CKCB kit April Skies.

This one is of my Grand daughter and I used some stickers from the Simple Stories sheet in my kit and the 6"pad of Authentique Classique Elegance.

Although she is a little girl and blues and such adult style papers wouldn't necessarily be the first 'go to' papers I would choose.. because it was a dark photo wearing pale clothes I thought I could get away with it.

I'm happy with the end result so here it is..


I used Heidi Swapps no.1 puffy sticker and some old foam alpha stickers for the title and I punched some scalloped circles and added paper flowers to the tags and the flower circles.

I used a Martha Stewart punch to cut two extra pieces out of the edges and backed the reverse with two scraps of dark grey from the same 6" pad.

As I said.. a quick post tonight.. so bye for now.. and do visit again soon.

Elaine
x

Friday, 8 April 2016

Multi tasking challenges

Hi all

Thanks for joining me again today.

This time I am bringing you a layout/canvas that has taken me a little outside my comfort zone in that it is far more 'dimensional' than I usually produce.

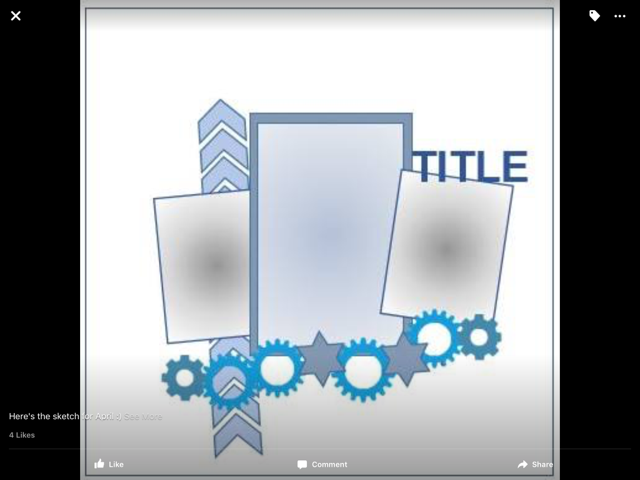
Initially I started with this sketch from my friend Sue who is a great sketch designer and I took this as my first inspiration. This month she provided the sketch for a Facebook group called 'Sketchy Scrappers on Facebook' and I was immediately tempted to use it for my layout. It is a  'for fun' only group..but it often kick starts my
mojo.


Then I took my kit I'd made for the Counterfeit Challenge Blog   that I have called April Skies and I blogged here . In it I had included lots of paper roses and flowers and I knew I wanted to make a layout using them.. I had also picked out an old (very old- I'm still a brunette!) photo of me to use from a photo shoot I had won once.. this also was inspired by a challenge over on good old UKS to Scrap Like You Mean it.. and the task was to scrap an old photo..so that was the basis for it. Over on the CKCB they had a challenge to use your kit for a shabby chic inspired layout- so here it is..my take of a Shabby Chic LO.

To make it, after Gessoing the heavy card stock, I took two different stencils and used Primas Opaque Matte texture paste to create a textured background. Then, when it was dry, I misted it heavily with Turquoise Perfect Pearls and Adirondack ink. That made the paper very wet and I had to leave it for some hours before I could work on it again.


In the meantime I took lots of the flowers, some chipboard gates (that I've had in my stash for EVER), other chipboard elements, some die cuts, hearts, pearls,resin flowers etc and painted them with a covering of white acrylic paint. Then I selected different ones to paint with either Cosmic Shimmer Tarnished Silver, Docrafts Artiste Pearl Frosted Mint and Mother of Pearl.


Once it was all dry.. I carefully arranged all of the flowers and die cuts around the edge of the photo to see what it all looked like. When I was happy,I used Prima Art Basics Soft Gloss Gel (transparent) to adhere all the elements to the page. I love this gel as when it dries it is completely invisible..so you can liberally attach all the items without fear of them ever falling off.


I added Prima Zinc glass beads and a stick pin along with some beautiful turquoise feathers I'd ordered from China months ago and had been waiting for the right project to use them on.

And here is the finished layout... me, for once, looking very glamourous! Lol.. and ... I confess....I am really pleased with the end result...so pleased that I have mounted it and it is going on my bedroom wall for a little while!


Well, that's it for now.. pop back soon.., you never know what I've been getting up to!

Elaine
x

Wednesday, 6 April 2016

WOYWW and 3rd CKCB LO

Morning all

Today I'm bringing you my desk for What's on Your Wordesk Wednesday.. If you have no clue what I am talking about, why not pop over to the Stamping Ground blog for a looksee.

Today my desk is full of nothing really.. the remains of the layout I made last night is on the desk but the rest of the mess is fairly organised and I know where most of my stuff is..I think!!

On the far left you can make out that there is a die cut sheet that is mostly empty and my plan this week is to start sorting out all my leftover sheet of dies, stickers etc and trying to put them in some sort of order... wish me luck! I also want to sort my ephemera in some sort of colour schemes too. I plan on using popper wallets for this, so if you pop back next week, I may have some of them for you to see.. watch this space!


Anyway.. here is the layout I made last night.. using my Counterfeit Challenge Kit. Someone asked me the name of the background papers but unfortunately it came in a 'job lot' and it didn't have a strip on it so I don't know.. I think it is American Crafts, but I'm not sure, so if anyone else knows, please do tell!


Thanks for stopping by.. I'm off to join in Stamping Grounds blog hop now.. laters!

Elaine
x

Tuesday, 5 April 2016

2nd LO with my April kit

Morning all.

Thanks for joining me again for the 2nd of the layouts I created with my April Skies Counterfeit Kit Challenge Blog kit at the crop I went to on Saturday. (I would have included them in the blog post that I did on Sunday but I had a camera malfunction.. aka I didn't keep the iPad still enough!) Lol.. I've been a bit busy since so this is the first chance I've had.


I decided to use the Gold, black and blues in my kit but I haven't started on the florals as yet.. I'm saving those for later in the month!

I used this sketch that I found on Pinterest but I cannot credit to anyone as I can't see who designed it. I have also decided to use this sketch again as I have used it to set a challenge over on UK Scrappers so it will get good use from me.
 
I again used the acetate sheet of gold 'PL' style cards and cut them up along with cutting some other PL style cards cut from the kit. I then added the photo, matted on black card stock and then added the embellishments.. quite a simple layout but an effective one in these lovely papers although, I know not why, it took me AGES to do this LO.. at least two hours.. which for me is an inordinately long time!

Anyway..a quick post from me today..but please remember to let me know you've visited and do swing by again soon!

Elaine
x

Saturday, 2 April 2016

Scrap Our Stash Book Inspired Layout

Hi again..

Thanks for popping by!

Today I am bringing you a layout that I made at the crop I attended on Saturday- and it was inspired by this image on the Scrap Our Stash blog  


The idea behind this challenge is to take inspiration from the book cover.. whatever it may be. In my case, it was the colours and the clouds. I also had to include at least 2 clouds.. which was fine as I was going to anyway..lol

And this is what I came up with:


For the inspiration from the positioning of the papers I used this sketch from Page Drafts who generously uploaded it to Pinterest for our use...thank you!


The papers I chose wererandomly selected from my stash and I'mafraid I didn't make a noteof the make and collections! (Sigh!)

Anyway.. that's it for today.. see ya soon?

Elaine
x


1st LO with my April Skies kit

Hi all

I've been cropping today.. had a fab time with my friends and I managed 4 layouts and 1 double layout... all for my sister in laws 50th birthday album.. her birthday is on the 12th so time is running out!

Anyway.. the first one was composed using my Counterfeit Challenge blog Kit, April Skies that I blogged yesterday... (thanks for the comments received!)

I used the gold, black and white from my kit to create this LO. I knew I wanted to use a sketch for this and so I found the latest sketch challenge over on Stuck?! Sketches Blog -designed by the talented Laura Whitaker.
So here is my take on this lovely sketch using my kit.


Not sure you can make it out but the gold stripe paper behind the photo is vellum and the heart and stripes to the side of the photo is acetate as is the & in the bottom cluster that I cut from a sheet too. The rest of the papers are Stampin' Ups 'Winter Woodland' retired (I think) paper collection. I then addedsome extra bling on the circles and stamped the camera on the bottom cluster (that caused some nerves I can tell you.. I'd almost finished the LO before I decided to add it.. so I was worried about ruining all my hard work and having to cover it over.. but all's well that ends well as it turned out perfectly.


I'll be back tomorrow with more layouts.. I would have added some others but I took photos in the daylight and when I went to add them here, I discovered I had had 'camera shake' and they were all blurry.. so I'll have to re-take them tomorrow.. lol

Anyway.. thanks for popping by again.

Elaine
x

Friday, 1 April 2016

CKCB Kit April Skies

Good morning all...

Today I am bringing you my Counterfeit kit inspired from the Counterfeit Challenge Blog here. Formore information, do visit their blog for some great ideas.

This month they challenged us to make a kit that was inspire, in whole, or in part, by these gorgeous C'est Magnifique kits here


As always, there is usually something that jumps out to me from these images..in this case it was the black and gold papers and images and the large floral papers. At first the florals had me stumped but in the end, as I scrolled through the master forgers blogs, that I too (Like Jimjams blog) that I had some 6" paper pads that would fit the bill..so I set about compiling this kit.

I went a bit off piste with the colours as I am a bit addicted to turquoise and blues so I have a lot of that in my stash! So I pulled out some blue and white floral papers and added them.


If you look closely you can see the florals...but after photographing the neatly laid out kit and storing it all away ready for use..I suddenly remembered a birthday gift that I was given on Monday.. MME's Finders Keepers Nob Hill collection. This also has plenty of florals in it, so please expect to see some of this delicious kit appearing in my projects too.
So.. without further ado.... here is the rest of my Kit...April Skies


I'm off to a crop tomorrow so I aim to get going with this lush kit then so do remember to popback soon to see what I've been up to.

See you again soon..

Elaine

x


Wednesday, 30 March 2016

WOYWW 30th March 16

Good morning

Sunshine here in Kent, UK today for once.. I'm getting fed up with all these April showers already..and it isn't even April yet! Lol..

This morning I am again bringing you my desk to join in with Stamping Ground What's on Your Workdesk Wednesday Blog.

Here you will see my cluttered desk from where I was working on the layout below.


You can also see in comparison to last weeks that I have got a new addition to the top of my desk.. a deep plastic tray that I am keeping allsorts of objects in to feed my new passion of mixed media., buttons, old key rings, charms, etc . This is the mini canvas I have made this week too.

Finally, one of the other changes since last week is that I (finally) have my blind up! Meaning I can now work in my craft room without being seen by all the neighbourhood! Having moved into a more built up residential area recently, I have been craving a bit of privacy so I am delighted with my blind that I can now angle for the right amount of light during the day and close it at night for privacy.

The other change is this shelving unit my dear husband built for me last week.. he's a treasure and I am so grateful!


So that's it.. I'm off to have a nose around other peoples desks..why not hop over to Stamping Ground and have a look with me..and, of course, join in too.
.

Have a good week all.. come back soon!

Elaine
x


Sunday, 27 March 2016

My second mixed media canvas

Good evening,

Thanks for stopping by again so soon.. I'm hoping you will think it is worth your while as today I am bringing you a second canvas.. really quite different to the last.


For this one I took some PVA glue and covered it with gold tissue paper, wrinkling it as I went. Once dried I took two stencils, a swirly circle one and a script one and used Prima texture paste with them. I left them to dry and added some rose gold mist (home-made) and some gold acrylic paint.

I then set about making my arrangement of bits and pieces I had collected together. The large brass saying 'Expensive but worth it' is an old key ring I have held on to for a while. I also had some paper die cuts, a fence, a fern and a heart. In addition I added a couple of gold buttons, some chain links, some charms and a few paper roses. I also added a crown into the arrangement that was left over from my sons wedding in 2012. I had a negative piece of card too that I had punched circles from and I used that too. The large square with a circle in is a piece of foam packaging painted gold and sprayed.


Once I was happy with the arrangement I took some Prima Translucent Gel and stuck each of the items down as planned. I wasn't overly happy with the way it was going so I realised that I needed to find a more cohesive colour scheme so I decided to paint all of the items with the gold acrylic paint.

It was looking pretty at that time so I filled in all the gaps with small pearls, gems, beads and bead spacers. I added two bows and misted it all with turquoise Perfect Pearls. This gave me the effect I was after but not enough of the blue, so I dripped some darker blue from the Dylusions range- so here is the finished canvas.


Thanks for popping in again.

See you again soon.

Elaine
x


Mixed Media Messiness!

Good morning..

Today I am bringing you something a little different for me..a mixed media canvas.

Just recently, although I've always been intimidated by them before, I have been getting more and more excited and interested in the Finnabair style by Prima. I have seen some wonderful examples on FB and on Pinterest, so I thought I'd have a go!

Now..I know I have a long way to go and a lot to learn..but here are my very first attempts...please bear with me while I'm on my learning process. Of course, because I'd watched a few tutorials on You Tube..I decided I just 'had' to get some more products! So off I went with my credit card (!) and bought some Prima Translucent Gel, Prima Gloss Gel and some new texture paste(my old stuff had gone off quite hard but there wasn't a lot left so I didn't mind too much) I haven't thrown it away yet..so if anyone knows of a way to instill new life into uber thick paste..do let me know. I had quite a bit if stash anyway but I found myself ordering some glass beads and Cosmic Shimmer sparkly texture paste too!


Then I had to decide what to decorate. As luck would have it, over on good old UK Scrappers, there is a mini canvas art swap..so without further ado, I ordered a set of mini canvasses from The Works. (6 for £2.99.. A bit of a bargain I thought!) and I started decorating.


It ended up as a really rather sparkly affair! First I covered it with extra strong tin foil sticking it with PVA glue, ensuring I wrinkled it as I was sticking it down. I then used four different Adirondack alcohol inks and daubed them all over the background. Once dried I adhered the title made from some Teresa Collins mini alphas. Which left me with the spaces that I needed to embellish.


I selected a collection of flowers (recently purchased from Wild Orchid Crafts) and layered them in a bit of cooking mesh I bought at Poundland eons ago (I knew it would come in handy one day) and then I poked in bits of broken jewellery and some smaller flowers.  I then finished it off with a smattering of pewter coloured bead spacers, various pearls and some sparky turquoise stars.


At this point I was happy enough with the composition but I wasn't happy with the way the title was sitting proud of the canvas. So this is where I got out the Sparkly Texture Paste... And I literally splodged it all around the title along the edges filling in all the gaps. It looked much better! Then I got a bit carried away! I added more and then..as if it wasn't sparkly enough.. I added some silver glass glitter that I had bought last year at a retreat I attended. I bought it from the on site shop supplied by Crafts for Eternity.


It covered a lot of the sparkly texture paste with the glass glitter and I then shook off the excess.

In the end I was quite pleased with it for my first attempt...any suggestions what I could do differently are always appreciated.

Well that's it...but come back soon as I have another, in my opinion, better canvas for you to see.

Elaine
x