Saturday 13 October 2018

Helping Hands | Elaine King | Small Photos

Good morning all

Didn't you just love this months prompt over on the UK Scrap Addicts Blog? I love to use small photos as it is always great way to use up several photos at once.  Here is the layout I made this month using the prompt 


When I am doing this I usually use a photo editing app. In this case I used Pic Collage so you can make lots of photos fit into a grid. I find that most online photo printing services will offer a 'square photo' option these days. I have discovered that the UK photo printing services of Snapfish offer a 4" square option and Free Prints offer a 5" square option. In this case I used the 5" option from Free Prints rather than print the photos out myself. 

To make this layout I used 4 photos that I had set into a square. In these apps you can often choose a background colour too. In this case I chose a cerise pink background which I echoed by using a cerise pink piece of cardstock as my background. 


Once I had cut apart my four photos in the grid I used them with a page kit from Crafts4Eternity 

I made some home made embellishments using washi tape for the central square and highlighted some of the black that features within the patterned papers. 


I made a cluster in the bottom left with more punched black card and some die cut circles that served as a journaling spot. 


I then punched a 2" heart for co-ordinating card and covered in sequins too. Each of the squares that were not photos were cut and layered to give each a cerise pink frame too. 


To finish I added flowers from my stash and some black puffy alphabet stickers that I got from The Works. 

My only dilemma is the title.. should it be Helping Hand..or Helping Hands??? You decide!! 

Thursday 13 September 2018

Good morning scrappers! 

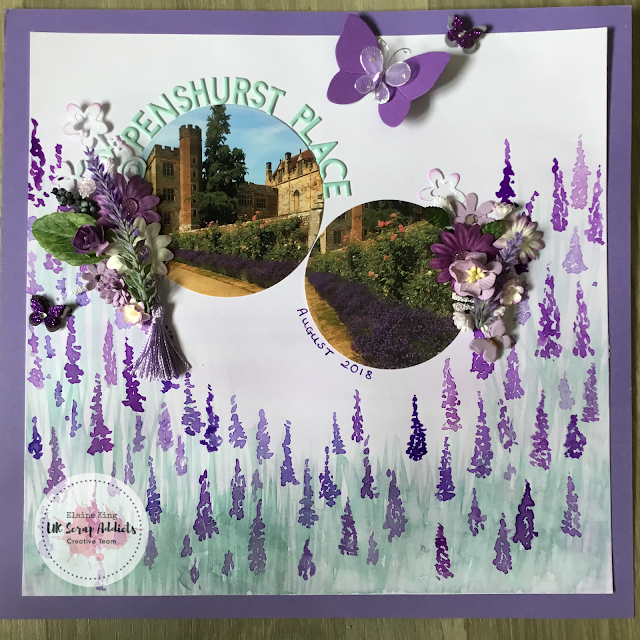
This morning I would like to share with you a layout I have made using your September Prompt of 'Paint' for the UK Scrap Addicts Blog 

Now, of course, the ideas for this are endless and it is an easy process to liberally daub paint, either acrylic or watercolours, on to the background paper and see what effect you can achieve. Of course one of the most difficult things about adding any sort of wet medium to your cardstock is that it will have a tendency to curl..which can be very annoying! To counteract this I used tape to stick down the edges to my glass cutting mat before starting adding the moisture to the paper/card. 

I used a heavyweight white card for my background which is 300gsm. I bought this in bulk from by 'go to' supplier Crafts4Eternity.  Of course you can use specialised watercolour paper for this but it does work out quite expensive and if you follow this simple tip you can use regular cardstock just fine!


Now, I'm no artist, but to me the techniques I used were very basic and I can explain a little of how I created the Lavender stems very simply..just follow along. 

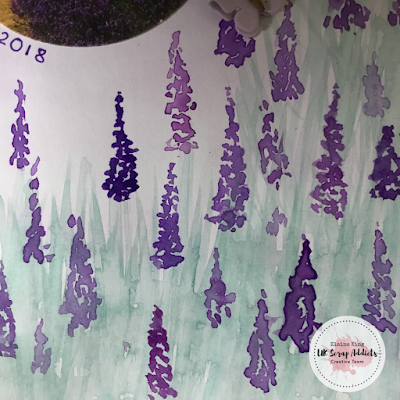
To start I took some inexpensive watercolours and mixed some pale mauve paint using reds and blues and a pale grey/green colour. I watered this down quite heavily and painted soft fluid strokes of the two colours horizontally across the page.  I then gently gently painted the stems/leaves onto the background card in upward movements in random directions using a slightly darker, less watered down, grey/green colour. You can see here how I painted across the masking tape that I used to stick the paper to my mat. 


Then I mixed deeper mauve colour using red and blue and started on the flower heads. To create these I used 'bobbling' movements with my paint laden brush in elongated triangular shapes. It really wasn't scientific..just keep your paintbrush moving in these shapes. You will see that these are varying shades of the purple I mixed as each flower head has a different amount of water added to my brush each time. This adds depth and field to the painting. 


Once I had painted all my Lavenders, and allowed it to dry, I removed the masking tape from the edges. Undoubtedly this will remove some of the layers of the card beneath so at this point I cut a border off the edges and matted the entire piece on a piece of dark mauve cardstock. 

I next set about creating the photo clusters. First I die cut two circular photos of varying size. I then used a selection of flowers and leaves to create my clusters and  added the title using Puffy Sticker Alphas that I bought from Lottie Loves Paper 


I hope you like what you see and that this simple tutorial gives you confidence to have a go..what have you got to lose? Do let us know what you think too!

Elaine
xx


Saturday 18 August 2018

Today | Tic Tac Toe | Elaine King

Good morning all

Today I am delighted to bring you a layout featuring our monthly Tic Tac Toe challenge card here


To start with I cut the black circle background paper that I first obtained as a free cut file from the UK Scrappers 
forum. They hold a wealth of free files for your own use so why not pop in for a look to see what's available?

I then chose my photo and selected a collection of papers that included black in. I came across this Simple 
Stories, Bliss collection,  that I bought from Craft4Eternity as a monthly page kit. 

I cut a selection of three strips from the Enjoy the Ride sheet and Remember to Shine page too. I then punched 
several 1 & 1/4" circles and placed these in a circle around the edge of the placement of the photo. I then 
mounted this on co-ordinating card-stock and mounted this on foam pads on top of the circle of circles to 
give dimension. I then drew some 'stitches' on all the papers too. 


To embellish I used several flowers from my stash and a journalling card along with some stickers from the 
Bliss sticker sheet and a chipboard butterfly and bird from the same collection.


The Today title was made using a sticker and then mounted on a piece of yellow paper scrap which I then fussy 
cut around.

The little flair badge was for a collection that I bought from Lottie Loves Paper. I added some strips of washi tape 
in co-ordinating colours and the pink arrows were cut using my Silhouette Cameo.

I hope you like what you see.. don't forget to pop over to the shops mentioned above. ..they hold such lovely pretty 
things to stroke!!! Lol 


Friday 13 July 2018

Superstar | 6" paper pad | Elaine King

Good morning all. 

My turn up on the blog today showing you my way to use up 6" paper pads. These can be very versatile to use for scrapbooking as they are, of course, already perfectly co-ordinated and even have nice little pop out ephemera all ready to use. 

To start with I found a photo I was keen to scrap, (my Mum and I back in March at her birthday celebration.) She was, conveniently, wearing a black sequin top and I too had a jumper with a silver star all in sequins too. How handy was that? 


Anyway, I went through my, not inconsiderable, collection of pads and found this one from Heidi Swapp which had pale blue, black and dotty papers that I knew would work with my photo. I found this pad at TK Maxx when they used to stock a decent range of craft supplies. 


I then matted my photo onto some black card that I got from Crafts4Eternity. Michele who runs the group stocks very good card stock that is brilliant for mixed media too. 

Once I had done this I took several sheets of the pad and cut them into 3/4" strips which I then cut further into 2" blocks ready for the herringbone piecing. I then inked all of the edges for definition. This was my practice run


To start I tried all of the pieces on the background card to make sure I had tried all the combinations to form my herringbone pattern. When I was happy I then took to sticking them all down. 

TIP: Use wet glue at this stage as it gives you more 'wriggle room' than DST or tape runners. 

Here it is.. almost straight! lol 


When they were all stuck down and dried I trimmed the overhang off the black card stock from C4E too. I then mounted the photo. 

To finish I added some die cut stars and sequin stars to embellish finishing off with some silver alphas for the title. 


I do hope the team are inspiring you this month to start using up those long hoarded paper pads. I know they are me! 

Thanks for stopping by, do remember to let us know you've visited. 

'til later


Wednesday 13 June 2018

UK Scrap Addicts| Elaine King | 6 x 4 photo

Good morning all


Thanks for joining me again on my journey showcasing British suppliers in the UK Scrapbooking industry. It gives me so much pleasure to support these small businesses and share my experiences with you all. 

For this month's prompt the Creative Team were tasked with creating a layout using just one 6 x 4 photo. As this is something I do regularly I wasn't fazed by this challenge but I wanted to share some techniques with you that may inspire you to get involved too. 

To start with I took several pieces of scrap white card stock and cut them into rectangles and layered them on a white background. I adhered them with medium gel and spread texture paste using a pallet knife to create texture. I also used a stencil with the same texture paste to add further interest.


Next I took some Tim Holtz Distress Oxides, (bought from Crafts4Eternity in Weston Super Mare) and added some pink and grey and misted with water to give it a splattered look. Once dried I then took an inch off each edge and layered the white cardstock onto a pink sheet of card (having gutted it first to use later).


I then took some scrap of pink and grey patterned papers an arranged them over the top of the textured rectangles with some die cuts I'd had for a while in my stash that one of my dear friends had cut for me. We got to know each other through the UK Scrappers forum and I am still an active member there. It's a shame more people aren't so if you have a spare few minutes, why not pop over and say hello? 

Anyway.. then I used some Prima washi tape, also sourced from Crafts4Eternity from one of their add ons from a monthly page kit, and layered this too. 


Finally I added the photograph that I had matted on  the gutted pink card and decorated with flowers from my stash. The little word expressions to the left of the photo are from a sticker sheet from Kaisercraft called P.S. I Love You as is the little heart above the photo too. 


I do hope you like the layout and it gives you some ideas how to use some of your scraps and add dimension. 

Thanks for stopping by!


Sunday 13 May 2018

UK Scrap Addicts| Monochrome layout

Good morning Everyone

Thanks for joining me on my first blog post since becoming a member of the UKScrap Addicts Creative Team.

Today I am bringing you a layout using a monochrome colours. There was some discussion in the team as to how we would define Monochrome, but essentially we all agreed that using just one colour, regardless of how many tones there were, and, if you would like to, adding in a tiny amount of black in amongst the colour was the definition. I hope that helps?

So, here is my layout.


For this I decided to use one of my all time favourite collections from Kaisercraft that I originally sourced from Merly Impressions, one of the leading Kaisercraft suppliers in the UK. This collection is called  Indigo Skies and, of course, is predominantly blue! Lol

To start my layout, I used a starry stencil using texture paste that I had added a little denim coloured distress ink too. 


I then used a 3" piece of the collection paper to pace at the left hand side where I then added two further strips of paper too. I then set about fussy cutting several flowers from the patterned papers and created a cluster at the bottom left of the photo and added a tag and some strips of paper on the right.


I added several enamel dots and a twirl of blue and white bakers twine in amongst the cluster and added a couple of wood veneers that I had coloured with distress ink too. 

One of my favourite 'techniques' and one that gets overlooked a lot, is to literally take a few 'chomps' of punched edge from the sides too. Once I had done this I trimmed the paper down to 11" x 11" and backed it onto a piece of blue cardstock too. 

I do hope you will join in our challenge this month..especially as we are in the month of National Scrapbooking Day too! Go on! Have some fun and do let us know what you've been up to. 


Tuesday 10 April 2018

Some exciting news!

Good morning all

Well today I have some very exciting news! 

I'm delighted to announce that I have been selected to become a new ambassador and designer for the UK Scrap Addicts Blog! What an honour to be chosen amongst so many talented designers. Thank you to the selection team. 

So, what does this mean? Well, for a twelve month stint, starting next month, I am to join the team and will be designing layouts for you to glean inspiration from to kick start your own projects. 

Each month I will be selecting a layout and/ or technique showcasing as many English brands and companies as I can and sharing lots of other hints, tips and projects from other designers on the team aswell. I do hope you will be joining me on my journey and will be commenting on the blog posts that myself and my fellow ambassadors will be sharing with you. 

Here are the the layouts I submitted for my DT application, I look forward to designing more for you as time goes along. Let's get behind the British Scrapbooking movement everyone! 


I hope these may keep you going until my term starts in June later this year! 

In the meantime I look forward 'seeing' you all online. 

Elaine
x


Sunday 8 April 2018

Some fresh layouts from me

Good morning all

I thought I 'd come on here and surprise you all with an update of my recent layouts made within the last month. 

Some were made at a retreat I went to in Birmingham recently and some were made at my local crop in Tonbridge, Kent, wherever they were made, I hope you like! 

I used a sketch from Stuck?! Sketch blogspot for this and added it to the White With One challenge blog aswell. 

This was made using Stampin' Up Designer Series Paper in Navy

This was made using a kit from Crafts4Eternity 

I dug out my Silhouette Cameo to create this cut file and used Kaisercrafts Let's Party collection

This was created using Kaisercrafts's Mint Wishes collection. I made the Christmas Tree using origami folds. 

This was another Crafts4Eternity kit


This was made using scraps of lots of collections

This was made using Simple Stories Winter Wonderland. I bought this collection from the wonderful PrettyMyPage shop

Another using the same collection 

And the final one using this collection. 

I hope you like what you see? Do let me now which one is your personal favourite..it'll make my day! 

Elaine
xx


Wednesday 14 February 2018

Kaisercraft blog challenge hexagon layout

morning all

A very quick blog post from me today using the Open Road collection. From Kaisercraft.
My beautiful niece inspired me with this lovely photo of her in this hat whilst on holiday within Australia where she now lives.

I am entering this into the Kaisercraft February 2018 blog challenge..wish me luck!


Elaine
xxx


Wednesday 10 January 2018

Kaisercraft Open Road collection Layout

Good morning everyone
It’s Elaine here today and I have pleasure bringing you a scrapbook layout using the Open Road collection and the fabulous Australia shaped die cut from the collection.

To start making the layout, first I took the Undiscovered paper from the Open Road collection. I then took a 3″ strip from the Prospecting paper and matted it on a piece of Sprout cardstock. I then stuck this on the left hand side of the base paper.


I then layered the Australia shaped die cut paper over the top and set about matting the six circular photos onto Toffee Weave Kaisercard. I had five photos I wanted to use for the layout (it’s a great way to use up multiple photos like this). However, I couldn’t make the five photos work effectively so I used a page from the 6.5″ paper pad and cut the bottom photo out of one of sheets. It’s very realistic looking isn’t it? The pad and the whole collection has iconic photos of Australia within it including their ‘outback’ page which is featured twice in the paper pad and once in the whole collection and is called Unearth in the 12″ papers

I then set about using embellishing the die cut using the Collectables pack and a extra elements that I fussy cut from the paper pad.
To finish I added the leaves from the collectables pack to link all of the circles around the edge and added my title.

I think you’ll agree this collection is just fab for all those travel photos you may have if you’ve been lucky enough to visit Australia, or have family there, as I do.
I do hope this has given you some ideas. Don’t forget to show us what you have created with your collection by linking your blog post to this post or, alternatively, adding it to the Merly Impressions Facebook page or to the Kaisercraft Corner Facebook Page where you can share all your creations using any Kaisercraft collection. I look forward to seeing you there!
Elaine
x