Hi all
Thanks for joining me again today.
This time I am bringing you a layout/canvas that has taken me a little outside my comfort zone in that it is far more 'dimensional' than I usually produce.
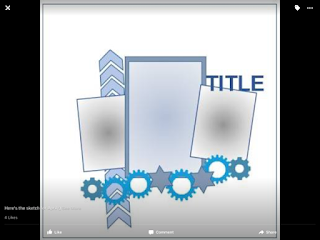
 Initially I started with this sketch from my friend Sue who is a great sketch designer and I took this as my first inspiration. This month she provided the sketch for a Facebook group called 'Sketchy Scrappers on Facebook' and I was immediately tempted to use it for my layout. It is a 'for fun' only group..but it often kick starts my
mojo.
Then I took my kit I'd made for the Counterfeit Challenge Blog that I have called April Skies and I blogged here . In it I had included lots of paper roses and flowers and I knew I wanted to make a layout using them.. I had also picked out an old (very old- I'm still a brunette!) photo of me to use from a photo shoot I had won once.. this also was inspired by a challenge over on good old UKS to Scrap Like You Mean it.. and the task was to scrap an old photo..so that was the basis for it. Over on the CKCB they had a challenge to use your kit for a shabby chic inspired layout- so here it is..my take of a Shabby Chic LO.
 To make it, after Gessoing the heavy card stock, I took two different stencils and used Primas Opaque Matte texture paste to create a textured background. Then, when it was dry, I misted it heavily with Turquoise Perfect Pearls and Adirondack ink. That made the paper very wet and I had to leave it for some hours before I could work on it again.
In the meantime I took lots of the flowers, some chipboard gates (that I've had in my stash for EVER), other chipboard elements, some die cuts, hearts, pearls,resin flowers etc and painted them with a covering of white acrylic paint. Then I selected different ones to paint with either Cosmic Shimmer Tarnished Silver, Docrafts Artiste Pearl Frosted Mint and Mother of Pearl.
Once it was all dry.. I carefully arranged all of the flowers and die cuts around the edge of the photo to see what it all looked like. When I was happy,I used Prima Art Basics Soft Gloss Gel (transparent) to adhere all the elements to the page. I love this gel as when it dries it is completely invisible..so you can liberally attach all the items without fear of them ever falling off.
I added Prima Zinc glass beads and a stick pin along with some beautiful turquoise feathers I'd ordered from China months ago and had been waiting for the right project to use them on.
And here is the finished layout... me, for once, looking very glamourous! Lol.. and ... I confess....I am really pleased with the end result...so pleased that I have mounted it and it is going on my bedroom wall for a little while!
Well, that's it for now.. pop back soon.., you never know what I've been getting up to!
Elaine
x


